soundcore Nebula P1i | Smart Projector with WiFi and Bluetooth
Transform your home, backyard, or camping nights into an immersive entertainment experience
choice
£369.99
- Flippable Audio Magic: Rotate the dual 10W Dolby Audio speakers 90° side to side or 200° up and down for sound that follows your vibe, perfect for any setup or scene.
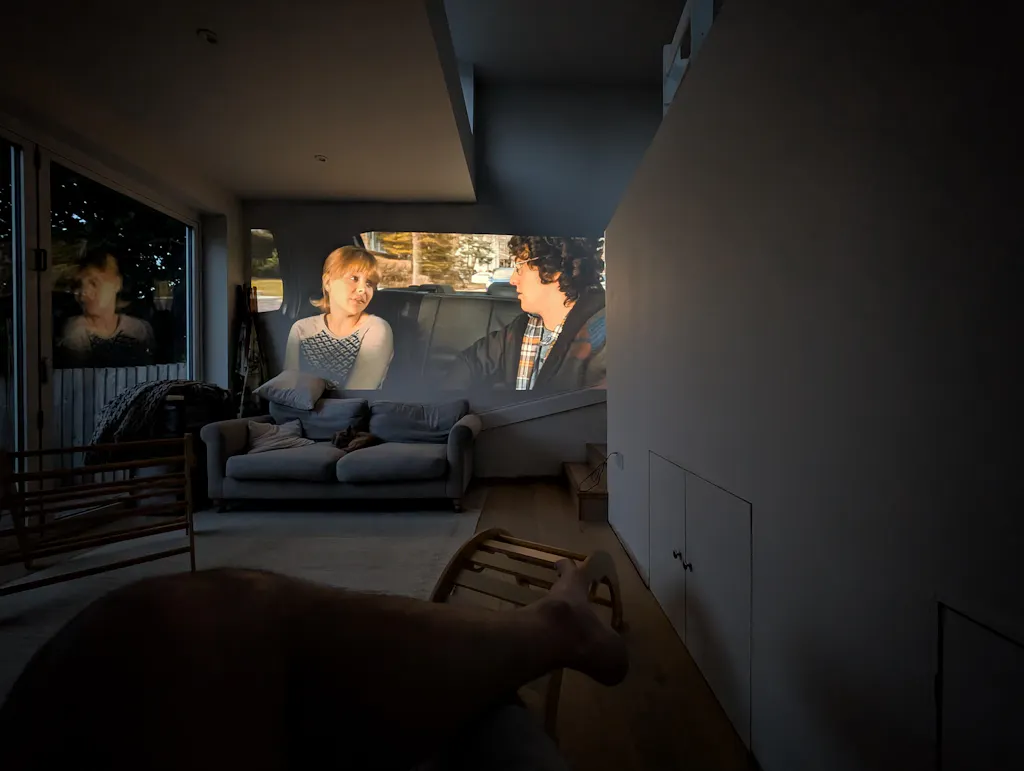
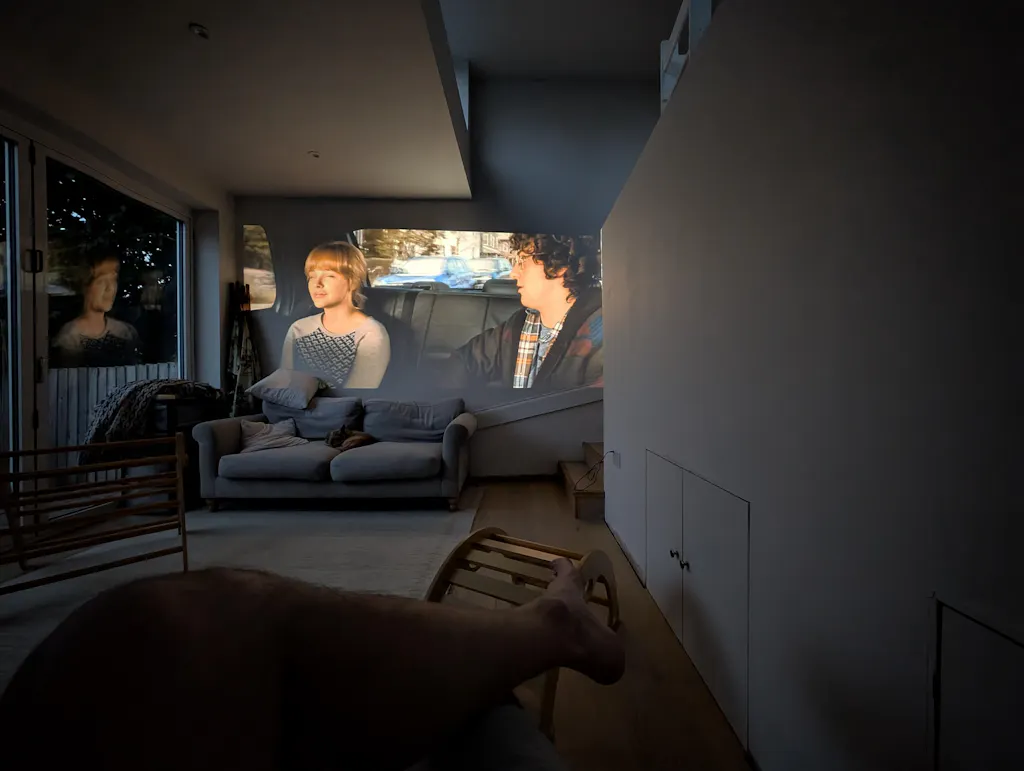
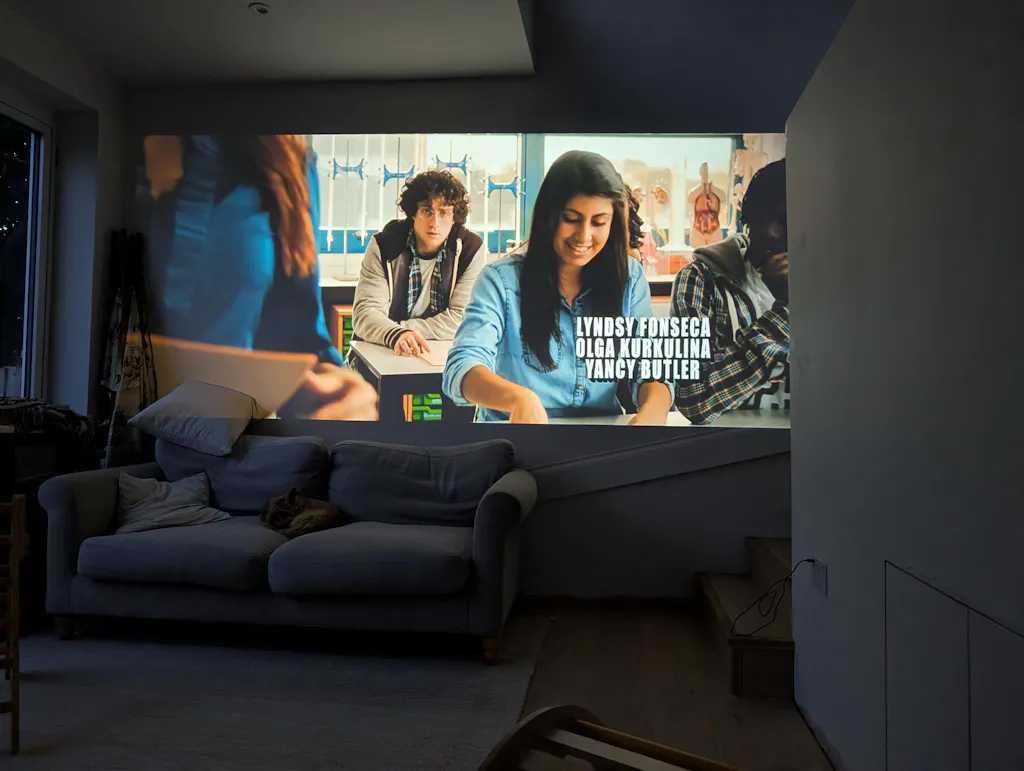
- True Brightness, Real Clarity: Enjoy lifelike details with TÜV‑certified 380 ANSI lumens and 1080p Full HD resolution that make every movie night pop.
- Designed for Consistent Viewing: All‑glass lenses and fully sealed optical engine resist dust and wear, keeping every frame crisp and clear even after hours of play.
- Smart Instant Setup (IEA 3.0): Just plug in and go. Autofocus, auto keystone correction, obstacle avoidance, and screen fit instantly deliver a perfect view every time.
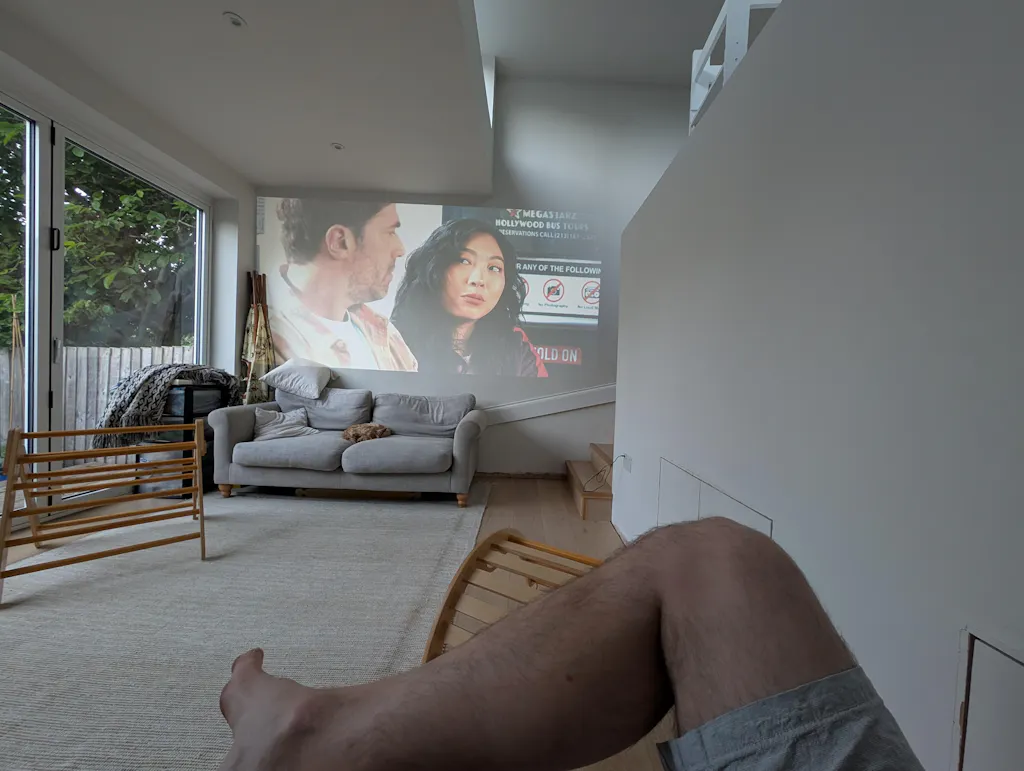
- Google TV, Stream It All: Access Netflix, YouTube, Prime Video, and more right from the projector—no extra devices needed, just endless entertainment anywhere.
Services and benefits
Want More Perks?
1. Priority Shipping2. Member Pricing on Selected Products 3. Birthday Gift4. Unlock Benefits with soundcoreCredits Learn More
Payment Method
soundcore Nebula P1i | Smart Projector with WiFi and Bluetooth
£369.99


FAQ
Features & Functionalities
1. Try a Wi-Fi network or cellular hotspot with a stronger signal.
2. To update the system version, go to all settings > system > about > system update.
- The device will reboot during this time.
- There may be a 2–3 minute system delay after the update and reboot.
3. To update the speaker version, go to all settings > Remotes & Accessories > Speaker L/R > Accessory update.
- The whole upgrade process will take about 25 minutes.
4. To update the remote control version, go to all Settings > Remotes & Accessories > Nebula Remote > Remote Update.
- If you are unable to receive the above update, please retry.
- If after retrying you are still unable to receive the update, you will need to provide your SN (Serial Number).
5. To view the SN, go to all Settings > System > About > Status > Serial Number.
6. If the above solutions do not resolve your issue, please contact Nebula Customer Support at support@seenebula.com for further assistance.
FAT32 / NTFS
This guide will help you understand common causes of projector lag and how to resolve them.
1. Initial Startup Latency
When you start your projector for the first time, you might notice some delay. This is usually caused by multiple applications launching at once and competing for system resources.
2. Lag after Firmware Upgrade
After updating the projector's firmware, you may experience a short delay of a few minutes. This happens because many applications are initializing simultaneously.
3. Background Application Updates
Lag can also occur when background applications update themselves. These updates use system resources and temporarily affect performance.
4. Identify the Type of Lag
Before troubleshooting, determine whether the lag occurs during video playback or system navigation:
- Video Playback Lag: Only happens during video playback and may be related to network issues or the video application.
- System Operation Lag: Noticeable when opening menus or moving focus in the system interface.
5. Steps to Reduce Lag
- Update the projector firmware to the latest version.
- Update all applications: Go to Settings > Applications > Manage Updates > View Available Updates > Updates. Select "Update All" if updates are available.
- Disable automatic app updates: Go to Settings > Apps > View all apps > Show system apps > Google Play Store. Tap your avatar, then Settings > Update apps automatically > Do not update apps automatically. You will need to manually check for updates after this.
- Turn off app content recommendations:
- For Google TV: Settings > Accounts & Profiles > Select your profile > Turn on Apps Only Mode. Note: You cannot download new apps in this mode.
- For Android TV: Scroll to the bottom of the Home screen > Customize Home Screen > Turn off app content recommendations > Promoted Channels > Close Apps > Spotlight.
6. Contact Support
If lag persists, contact Nebula Customer Support (support@seenebula.com) and provide the following:
- Name of the application causing the delay or description of when it occurs.
- Serial number of the projector.
- A video showing the lag.
- Mode of any connected external devices (TV boxes, USB drives, game consoles, speakers, etc.).
- Remaining storage space: Settings > System > Storage > Internal Shared Storage > Available.
1. Try another Wi-Fi network.
2. Check that your time zone is accurate. Go to Settings > System > Date and Time.
3. Go to Settings > Apps > See All Apps > App Name > Clear Cache.
4. Go to Settings > System > About > Reset > Factory Reset to reset.
Reusable
https://support.seenebula.com/s/article/What-Should-I-Do-if-My-Google-TV-NEBULA-Projector-Has-a-Black-or-Flickering-Screen
After powering off and restarting the projector, press the power button on the remote control to turn it on again, and then press “Volume Down” button quickly and continuously to enter Data Erase Mode.
Note: This method may not succeed on the first try and may require multiple attempts.
Wait for the erase process to complete and then you can start the device normally.
The erasing process will delete all local files and data.
Reusable
https://support.seenebula.com/s/article/What-Should-I-Do-if-My-Google-TV-NEBULA-Projector-Can-t-Connect-to-Wi-Fi-or-is-Constantly-Disconnecting
1. The remote control is already paired when the product is shipped.
2. If the remote control is not paired when you receive it, click on the Microphone Button on the remote control and follow the UI prompts to re-pair it.
The MEMC (Motion Estimation and Motion Compensation) function on your projector enhances dynamic content by predicting motion trajectories and inserting intermediate frames to improve smoothness. While MEMC is a powerful tool for action-packed scenes, its effectiveness depends on proper configuration and content type. Below is a guide to optimizing its use:
How to Enable and Adjust MEMC Settings?
Go to Settings > Navigate to Settings > Display & Sound > Picture > Advanced Settings > MEMC (Off, Low, Middle, High).
Recommended Use Cases
MEMC delivers the most benefit in scenarios with fast, complex movements:
- Action Movies: Enhances clarity during explosions, fights, or chase sequences.
- Sports Events: Reduces blur in fast-paced sports like soccer, tennis, or motorsports.
- Video Games: Improves responsiveness for fast-paced gaming experiences.
When to Avoid Using MEMC?
MEMC may introduce unnatural artifacts when applied to incompatible content:
- Static Scenes or Slow-Motion Content: MEMC's frame interpolation may over-process slow movements, causing "soap opera effect" or ghosting.
- High-Frame-Rate Videos: Pre-optimized content may lose detail or develop tearing.
- Animated Shows or Text-Based Content: Over-interpolation can distort details in cartoons or presentations.
Note: For these cases, disable MEMC or use Low mode to maintain visual authenticity.
Troubleshooting of MEMC
If you notice unnatural effects (e.g., ghosting, over-smoothing, or tearing):
1. Lower the MEMC Level: Switch to Low or Middle to reduce over-processing.
2. Disable MEMC: Turn it off for scenes with minimal motion or high frame rates.
- Check Source Quality: Poorly encoded content may amplify artifacts; ensure your source is high-quality.
If the above solutions cannot solve your issue, please contact Nebula Customer Support at support@seenebula.com for further assistance.
When only one HDMI cable is connected, the projector can automatically switch to the HDMI signal, or you can manually select the HDMI signal. When the projector detects the signal, it will display the content projected over HDMI. If the HDMI cable is unplugged, the behavior of the projector will vary depending on how the signal was initially selected. If the signal was connected via automatic switching, it will automatically return to the initiator. If the signal was connected via manual switching of the HDMI signal, it will stay at the No Signal screen.
1. Confirm that the adapter is plugged in normally, both ends of the charging cable are plugged in normally, and press the Power Button.
2. Confirm the status of the power indicator light.
If the indicator light is not on and there is no response when you press the Power Button several times, you need to check whether the adapter and charging cable are normal, and whether you can charge other devices; if you confirm that there is no abnormality in the adapter or charging cable, the probability is that it is a software and hardware problem, and you need to contact customer service to solve the problem.
If the light is red, continue to press the Power Button and the remote control's On Button. If there is still no change, the probability is hardware and software problems, you need to contact customer service to solve.
If the red light is flashing fast, it means the adapter or charging cable is not powerful enough, please use the original adapter and charging cable, or other 100W adapter and 5A charging cable to confirm.
If the white light is on, but there is no image, then it is a software and hardware problem, you need to contact customer service to solve it.
1. Check if the TOF sensor of the machine is covered in any way. The TOF position should not be covered.
2. When the TOF sensor is dirty, wipe the TOF sensor lens with a soft tissue or eyeglasses cloth. The position of the TOF sensor is shown in the figure 4 below.
3. Restart the device
When the products leave the factory, we carry out a strict check. Dust accumulation in the lens is related to the use environment, and it is inevitable that dust will enter the lens after a long time of use. However, through our efforts, a small amount of dust will not affect the projection effect. If you are affected by this, please contact our after-sales department for assistance. We apologize for any inconvenience caused.
1. Use a different HDMI cable.
2. Connect the projector to another device using an HDMI cable.
3. Disconnect from the projector and then try to connect your device to the TV via HDMI.
4. Adjust the HDMI output resolution of the connected device to match your projector.
Please try using autofocus.Path 1: Short press the Focus Button on the remote control.Path 2: All Settings > Projector > Focus > Start Auto Focus.
If it's still blurry after auto focusing, long-press the focus button on the remote control, then tap Manual Focus to enter the manual focus interface. Press the left and right arrow keys to adjust the screen until it is clear.


