


Projection Mapping Projector Guide: What to Look For
Turning a static object into a living, breathing spectacle requires more than just creativity—it demands the right tool for the job. Whether you are an artist planning a building-sized installation, a business owner looking to create an eye-catching window display, or a hobbyist eager to experiment, the device you choose sits at the very heart of your project.
The market now offers models tailored for almost every conceivable scenario, from ultra-portable units to professional-grade outdoor systems. Selecting the ideal projection mapping projector can feel complex, but understanding a few key specifications will immediately clarify which path you should take.
This guide explores what makes a projector suitable for mapping and highlights some of the most compelling options available in 2026 to help you make an informed decision.

What Is Projection Mapping?
Projection mapping is a creative technique that turns objects into a display surface for video projection. Unlike traditional projecting on a flat screen, this method uses specialized software to map a virtual image onto the physical shapes of an object.
You might wonder, can you use any projector for projection mapping? While many standard units work for basic tasks, the complexity of your project usually dictates the hardware requirements. This process involves several layers of technology working in harmony:
- Spatial mapping: This identifies the edges and textures of the physical object, such as a building or a statue.
- Warping and masking: The software distorts the image so it fits perfectly onto non-flat surfaces without looking stretched.
- Content creation: Artists create specific videos or animations that interact with the physical features of the target object.
- Illumination: High-intensity light sources ensure the colors remain vivid even when the surface isn't perfectly white.
- Syncing: For larger displays, multiple units work together to create a seamless, wraparound visual experience.
Key Features to Look for in a Projection Mapping Projector
Finding a high-quality 3D mapping projector requires more than just checking the price tag. You need a device that can handle complex geometries while maintaining a crisp image. Because you often project onto irregular surfaces like brick or fabric, the light quality must be exceptional. If you want your visuals to pop, keep these essential features in mind:
- Lumens and brightness: In the UK, ambient light can be unpredictable. High ANSI lumens ensure your projection stays visible even if the room isn't pitch black.
- Throw ratio: This determines how far back you need to place the device. Short-throw lenses are fantastic for tight indoor spaces where you can't place the hardware far away.
- Contrast ratio: Deep blacks and bright whites are vital for creating the illusion of depth and 3D movement on a flat surface.
- Connectivity options: Look for HDMI, Wi-Fi, or even 4G capabilities to ensure you can feed content from your laptop or media player without hassle.
- Resolution: While 1080p works for many, 4K resolution provides the fine detail needed when people view the projection from a close distance.
Recommended Projection Mapping Projector in 2026
The devices listed below represent a cross-section of what is currently possible, ranging from all-in-one mobile theatre Nebula projectors to rugged, installation-ready workhorses.
Each model brings a distinct set of capabilities to the table, solving specific challenges that mappers face. If your priority is absolute portability, jaw-dropping brightness, or the precision of integrated software, there is a tool here designed to elevate your next project. Let’s look at how they stack up.
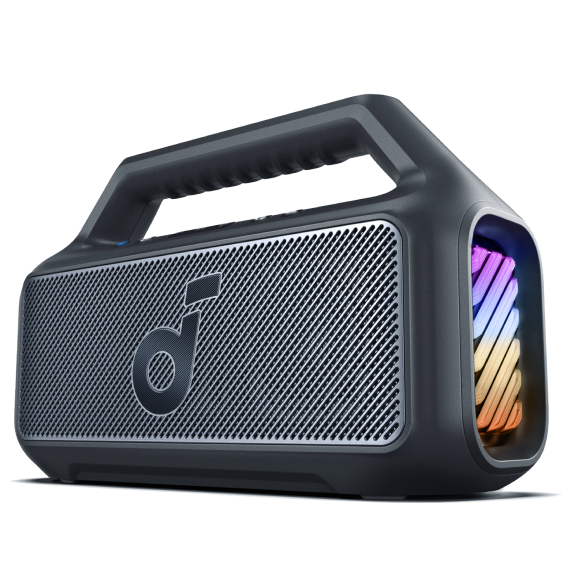
1. soundcore Nebula X1 Pro
The soundcore Nebula X1 Pro redefines what a 3D mapping projector can be by integrating a high-performance 4K laser engine with a detachable, room-filling sound system. For projection artists, this unit eliminates the need for separate audio equipment, making it an incredibly portable solution for pop-up installations and live events.
Its all-in-one design means you can arrive at a venue, wheel it in, and have a complete audiovisual experience ready in minutes. It stands out as the best recommended for those who need to combine stunning visuals with immersive audio without complicated setup.
- Triple-laser 4K engine for sustained brightness and sharper detail.
- High native resolution that supports fine mapping on textured surfaces.
- Integrated Dolby-capable audio to pair visuals with strong sound without extra kit.
- Robust thermal management suitable for extended runs in enclosed spaces.
- Flexible input and smart features for easy playback and remote control.

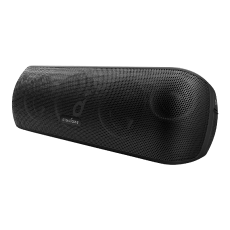
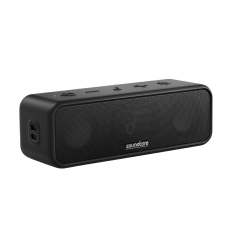
2. soundcore Nebula P1
If portability and creative freedom are your priorities, the soundcore Nebula P1 offers a unique advantage for the travelling mapper. Its groundbreaking magnetic, detachable speakers allow you to physically separate the audio source from the projection unit.
This is perfect for guerrilla-style mapping projects or interactive installations where sound needs to be positioned independently from the visual source. As a projection mapping projector for home studios or on-location gigs, its compact size and robust feature set make it a versatile and powerful creative companion.
- Compact, portable chassis that’s quick to deploy for site tests.
- Detachable high-quality speaker for simple audio-visual demos.
- Auto-keystone and fast setup aids for quick alignment on small canvases.
- Battery or short-term portable operation options for flexible locations.
- Affordable price point for creators wanting hands-on mapping practice.

3. LAZR 4G™ Video Mapping Projector
The LAZR 4G™ is a specialized tool engineered for one purpose: permanent, professional outdoor projection mapping. It answers the question, can you use any projector for projection mapping in a harsh environment? The answer is no, which is why this unit exists.
It arrives with Lumiverse™ mapping software pre-installed and features a robust IP-rated body designed to withstand extreme weather year-round. This is the choice for artists and installers who need a "set it and forget it" solution for building facades or permanent art installations.
- Purpose-built optics and firmware tailored for video mapping workflows.
- Robust mounting and alignment features for large venue installs.
- Media server friendly with reliable heat management for long events.

4. Optoma ZH350ST
The Optoma ZH350ST is a masterclass in efficiency and practicality for indoor mapping projects. Its primary superpower is its ultra-short throw lens, which can project a massive image from just over a meter away.
This makes it ideal for retail window displays or museum exhibits where space is at a premium and you need to keep the technology out of the visitor's way. Its laser light source ensures consistent, maintenance-free performance for years, making it a reliable workhorse.
- Short-throw projection for close placements and reduced shadowing.
- High brightness and strong contrast for controlled stage or indoor environments.
- Proven reliability and simple control options for event technicians.

5. BenQ TK850i
For the enthusiast or professional working primarily in high-end residential or hospitality settings, the BenQ TK850i offers exceptional value. It is designed to deliver a brilliant, true-to-life 4K HDR picture, which is essential when mapping onto detailed interior features like columns or ornate ceilings.
Its high brightness and robust color accuracy ensure that your mapped content looks vibrant and integrated with the space, rather than just washed out over it. It is a reliable choice for those who need 4K precision without stepping up to dedicated commercial installation gear.
- 4K HDR processing that preserves detail on textured surfaces.
- User-friendly smart platform for quick content playback and testing.
- Good color handling tailored for interior installations.

How to Set Up a Projection Mapping Projector
Setting up a projection mapping job is part planning, part calibration. The steps below assume you already have your surface model and content files prepared. Take your time with alignment — small adjustments matter.
- Scout & measure: Measure the projection area precisely. Sketch mounting points and measure throw distances.
- Choose placement: Position the projector to minimize obstructions and shadows. Use short-throw lenses if space is tight.
- Mount securely: Use a stable bracket or truss. Lock the projector to prevent drift during the show.
- Power & ventilation: Confirm power access (230V) and allow airflow for cooling; avoid enclosed spaces without ventilation.
- Connect sources: Use HDMI/DisplayPort for high bandwidth; for multi-projector rigs, synchronize playback via LAN or SMPTE timecode.
- Geometric correction: Use your mapping software to warp and mask the image to the surface. Start with coarse alignment, then refine pixel-perfect registration.
- Edge blending (if needed): For multi-projector arrays, blend edges to create a continuous image without visible seams.
- Color & gamma matching: Match color temperature and gamma across projectors so the mapped image looks uniform.
- Test run: Play the full video and monitor thermal behavior, network stability, and sync. Adjust brightness and contrast for the surface texture.
- Permissions & safety: For public outdoor mapping, check local council rules, permissions, and consider public liability and noise restrictions.
Tips to Make Your Projection Mapping Look More Professional
Achieving a polished, professional look is the difference between simply projecting an image and creating a believable illusion. It requires attention to detail that goes beyond simply plugging in a mapping projector. These tips focus on the nuance that elevates a project from good to breathtaking.
- Start simple: Begin your practice on simple, flat surfaces like a cabinet or a door. Master the fundamentals of your software before tackling a complex, curved surface.
- Mask the edges: Use your software's masking tools to perfectly cut the image to the object's outline. Any light spilling onto the background destroys the illusion. Pixel-accurate alignment is the goal.
- Match content to surface: Design your visuals to interact with the object's architecture. If there are windows or columns in a building, make your content bend around them or emerge from them, rather than just sitting on top.
- Consider the ambient light: The darker the environment, the richer and more solid your projected image will appear. Control the light in your space as much as possible to increase perceived contrast and color saturation.
- Use high-quality source media: Low-resolution or heavily compressed video will look unprofessional when blown up to large scale. Always use the highest quality source files your system can handle to leverage the full potential of a 4K projector.
Conclusion
Finding the perfect projection mapping projector is an investment in your creative future. With the technology available in 2026, the only real limit is how far you are willing to push your imagination. Start small, experiment with different surfaces, and soon you will be transforming the world around you with nothing but light and a bit of digital wizardry.
FAQs
How to do projection mapping at home for beginners?
Beginners can try projection mapping at home by using a projector to display visuals on objects like walls, furniture, or decorations. Start by choosing a simple surface and connecting your projector to a laptop. Then use beginner-friendly projection mapping software to align or “map” the visuals to the object’s shape. Dim the room lights and adjust the image position and size until the content fits the surface neatly.
How many lumens are needed for projection mapping?
For projection mapping, brightness needs vary based on the environment and surface size. Small indoor setups or nighttime residential projects typically require 3,000 to 5,000+ ANSI lumens to produce clear visuals. If you plan to project on larger surfaces or in areas with some ambient light, choosing a projector with 5,000 to 10,000 lumens or more helps maintain brightness, color clarity, and detail in the mapped visuals.
Can you do projection mapping with a normal projector?
Yes, you can do projection mapping with a normal projector. The key requirement is not the projector itself but the mapping software that adjusts and aligns visuals to fit the surface. For small indoor projects or home setups, a standard projector can work well. However, for larger surfaces or brighter environments, a projector with higher brightness and better resolution will usually produce clearer and more detailed results.


