


How to Connect to Projector Wirelessly in Minutes
Setting up a projector shouldn’t mean digging through cables or dealing with incompatible ports. If you want a faster, cleaner setup, it makes sense to connect to projector wirelessly instead.
Whether you’re using an iPhone, Android phone, Windows laptop, or Mac, there are a few reliable ways to do it—like screen mirroring, casting, or using built-in apps. Below, you’ll find straightforward instructions that help you get connected with minimal setup.
Wireless Connection to Projector: Common Methods Explained
When you’re wondering how to connect to projector wirelessly, you’re usually choosing between a few well-established methods. Each works slightly differently, and the one that works for you depends on what both your device and your projector support.
1. Screen Mirroring (Miracast, AirPlay, Google Cast)
This is the most common way to connect. It lets you send your screen to the projector in real time.
- Miracast (Windows & Android): Think of it as “HDMI over Wi-Fi.” It creates a direct wireless link between your device and the projector, so whatever is on your screen appears instantly on the big display.
Miracast is built into Windows 10/11 laptops. Many Android phones also support Miracast natively, though it may appear under different names such as Screen Cast, Wireless Display, or Smart View (Samsung).
- AirPlay (Apple devices): Built for iPhone, iPad, and Mac. It works over Wi-Fi and can either mirror your entire screen or stream specific content like videos.
- Google Cast / Chromecast: Instead of mirroring everything, this often streams content directly from apps (like YouTube) to the projector. Your phone acts more like a remote.
What to watch: Your projector must support the same protocol. For example, a Chromecast-enabled projector won’t automatically work with AirPlay.
2. Wi-Fi Direct (No Router Needed)
Wi-Fi Direct lets your device connect straight to the projector without using a Wi-Fi network. The projector creates its own connection, and you join it from your phone or laptop.
Once connected, you can mirror your screen as usual. This is useful in places where Wi-Fi isn’t available or reliable, like meeting rooms or classrooms.
The main thing to check is whether your projector supports Wi-Fi Direct, as not all models include it.
3. Streaming Devices (Add Wireless to Any Projector)
If your projector doesn’t support wireless connection, you can add it using a streaming device like Google TV Streamer (formerly Chromecast), Fire Stick, Roku, or Apple TV. These plug into the projector’s HDMI port.
After that, your phone or laptop connects to the device instead of the projector. You can then mirror your screen or stream content directly from apps.
This is often the easiest option for older projectors and usually gives a more stable connection.
4. Manufacturer Apps
Some projectors use their own apps for wireless connection. You install the app on your device and connect through it. These apps can let you mirror your screen, share files, or control the projector.
They can work well, but only with specific projector models, and setup may take a bit longer compared to standard screen mirroring.
How to Connect a Phone to a Projector Wirelessly
If you want to connect to projector wirelessly from your phone, you’ll usually be using screen mirroring or casting. The exact steps depend on your phone (iPhone or Android) and whether your projector supports AirPlay, Miracast, or Chromecast.
For iPhone (AirPlay)
AirPlay is built into iPhones and works with compatible projectors or an Apple TV streaming device.
Steps:
- Turn on your projector and enable AirPlay / Screen Mirroring mode.
- Connect your iPhone to the same Wi-Fi network.
- Swipe down from the top-right to open Control Centre on your iPhone.
- Tap Screen Mirroring.
- Select your projector (or Apple TV) from the list of available devices.
- Enter the on-screen code if prompted.
- Wait a few seconds for the screen to appear
Once connected, everything on your phone is mirrored in real time.
For Android (Cast / Smart View / Screen Mirroring)
Most Android phones support wireless display, but the name varies by brand.
Steps:
- Turn on your projector and open Screen Mirroring > Android / Miracast mode.
- Ensure your projector and Android phone are connected to the same Wi-Fi network.
- Swipe down to open Quick Settings on your Android phone.
- Tap:
- Cast (Pixel / stock Android)
- Smart View (Samsung)
- Screen Share (LG)
- Wait for your projector to appear.
- Tap the projector name to connect.
- Accept any pairing request on the projector.
How to Connect a Laptop to a Projector Wirelessly
If you’re asking how to project laptop to projector wirelessly, the process is just as straightforward. You just need the right projector support.
For Windows (Miracast)
Most Windows 10/11 laptops support Miracast by default.
Steps:
- Turn on your projector and enable Screen Mirroring / Miracast.
- Make sure the projector is on the same Wi-Fi network as your laptop.
- On your laptop, press Windows + K, or go to Action Centre > Project > Connect to a wireless display.
- Select your projector from the list.
- Once connected, press Windows + P to choose your display mode:
- Duplicate (same screen)
- Extend (use as second display)
- Wait for the connection to complete
For Mac (AirPlay)
MacBooks use AirPlay, similar to iPhones.
Steps:
- Connect your Mac and projector to the same Wi-Fi.
- Turn on AirPlay / Screen Mirroring on the projector.
- On your MacBook, click the Control Centre in the top-right corner.
- Select Screen Mirroring.
- Choose your projector (or Apple TV) from the list.
- Enter the pairing code if needed.
- Adjust display settings in System Settings > Displays. You can choose to mirror or extend your screen.
Using Chromecast (Works on Any Laptop with Chrome)
This is useful if your projector has Chromecast built in, or you have plugged a Chromecast dongle into your projector’s HDMI input.
Steps:
- Ensure both the projector/Chromecast and your laptop are on the same Wi-Fi network.
- Open the Google Chrome browser on your laptop.
- Click the three-dot menu (top right).
- Select Cast.
- Click the Sources dropdown menu and choose:
- Cast tab (just browser content)
- Cast screen (entire screen)
- Select your projector / Chromecast device from the list.
Best Projectors for Easy Wireless Setup
If easy wireless setup is the priority, the best projector isn’t just the one with the sharpest picture. You also want built-in streaming, simple casting, and automatic setup features that let you go from opening the box to watching or presenting without fiddling.
The three Nebula projectors below cover these well, but each suits a different kind of use:
Best for premium home viewing: soundcore Nebula X1
The soundcore Nebula X1 is built for a home setup where you want strong picture quality without dealing with complicated installation.
It uses a 4K triple-laser light source with 3,500 ANSI lumens, so you get a bright, detailed image that works well even in typical living room lighting. Dolby Vision support and solid contrast also help films look more natural, especially in darker scenes.
What makes it easier to use day to day is how much it handles automatically. Features like autofocus, auto keystone, screen fit, and obstacle avoidance reduce the need for manual adjustments, while the motorised 25° gimbal helps if you can’t position it perfectly.
With Google TV and built-in casting, you can stream directly or mirror your phone or laptop without extra hardware. The bundled 200W 4.1.2 speaker system also means you don’t need to sort out separate audio straight away.

Best for: A high-quality home cinema setup that stays simple to use and doesn’t rely on extra devices.
Key features:
- 4K triple-laser projection with 3,500 ANSI lumens for bright, detailed viewing
- Dolby Vision and strong contrast for more realistic picture quality
- Google TV with Netflix support for direct streaming
- Built-in casting for easy wireless connection from your devices
- Autofocus, auto keystone, screen fit, and obstacle avoidance
- Motorised 25° gimbal for flexible placement
- 200W 4.1.2 surround sound with wireless speakers
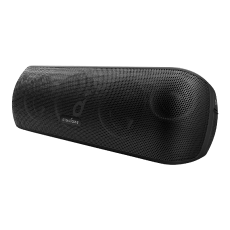
Best for portability: soundcore Nebula Capsule 3 (New)
The soundcore Nebula Capsule 3 (New) is designed for the sort of use where you want to watch something in the bedroom, take it to a friend’s house, set it up in the garden, or pack it for a trip without giving much thought to space.
This soda-can style projector is small, light at 0.85 kg, and has a built-in battery rated for up to 2.5 hours in Eco Mode, which is enough for many films without needing to stay plugged in. The 1080p resolution and 200 ANSI lumens are more suited to dim or dark environments, but that trade-off makes sense for a portable model.
In terms of wireless use, it’s very straightforward. You get Google TV, licensed Netflix, and Chromecast support built in, so streaming and casting are simple from the start. It also includes autofocus, auto keystone, screen fit, and obstacle avoidance, which is especially useful when you’re setting it up in different places each time.

Best for: Casual viewing at home or on the go, where portability and simplicity matter more than maximum brightness.
Key features:
- Compact soda-can design (0.85 kg) for easy transport
- Built-in battery (up to 2.5 hours in Eco Mode)
- 1080p resolution with up to 120-inch screen size
- Google TV with Netflix support
- Chromecast built in for wireless casting
- Autofocus, auto keystone, screen fit, and obstacle avoidance
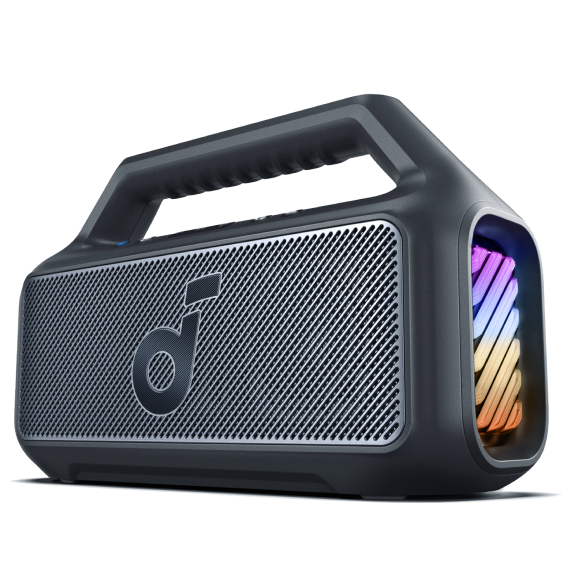
Best for an upgraded flagship setup: soundcore Nebula X1 Pro
The soundcore Nebula X1 Pro is designed for a more immersive setup where picture and sound both take centre stage.
It keeps the 4K triple-laser projection and 3,500 ANSI lumens brightness, but adds a much more powerful 400W wireless Dolby Atmos 7.1.4 audio system. That includes multiple speakers and subwoofers working together to create a more surround, room-filling effect.
Google TV is built in for streaming, and you can connect over Wi-Fi for screen mirroring. Like the X1, it includes automatic image adjustment features and a motorised gimbal, so positioning is less restrictive.
Despite its size, built-in wheels and a telescopic handle make it easier to move between rooms or take it into your garden.

Best for: A high-end home cinema setup where you want a bigger, more immersive audio and visual experience.
Key features:
- 4K triple-laser projection with 3,500 ANSI lumens
- 400W wireless Dolby Atmos 7.1.4 surround sound system
- Smart audio calibration to adapt sound to your space
- Google TV with wireless casting support
- Autofocus, auto keystone, and screen alignment features
- Motorised 25° gimbal for flexible placement
- Built-in wheels and telescopic handle for easier movement
Conclusion
Connecting your devices doesn’t have to be complicated. Once you understand the available methods and what your projector supports, it becomes much easier to connect to projector wirelessly without trial and error. Whether you’re using a phone for quick sharing or a laptop for work or streaming, the right setup can save time and reduce clutter. If you’re choosing a new projector, built-in casting and automatic setup features make a noticeable difference in everyday use.
FAQs
Can you use Bluetooth to connect to a projector?
Bluetooth is generally designed for audio rather than video. While you can easily pair a projector with Bluetooth speakers or headphones for better sound, you cannot typically stream video data this way due to bandwidth limits. To share your screen, you should use Wi-Fi-based methods like AirPlay or Miracast instead. This ensures a stable, high-quality picture without the lag or stuttering associated with Bluetooth connections.
How do I connect my iPhone to a projector?
The easiest way is to use AirPlay. First, ensure your iPhone and projector share the same Wi-Fi network. Open the Control Centre on your phone and tap the “Screen Mirroring” icon. Select your projector from the list and enter any code shown on the screen. Your display will mirror instantly. Alternatively, you can use a Lightning or USB-C to HDMI adapter for a reliable wired connection.
Can I connect my phone to a projector with a USB?
Yes, but it depends on your phone’s hardware. Many modern Android phones and iPhones with USB-C ports support “DisplayPort Alt Mode,” allowing a direct connection using a USB-C to HDMI cable. Older devices might require an MHL adapter or a specific app provided by the projector manufacturer. If your projector has a standard USB port, it is often meant for playing files from a thumb drive instead.


